
03-07 Ford 6.0L Ford 6.0L Regulated Return Kit
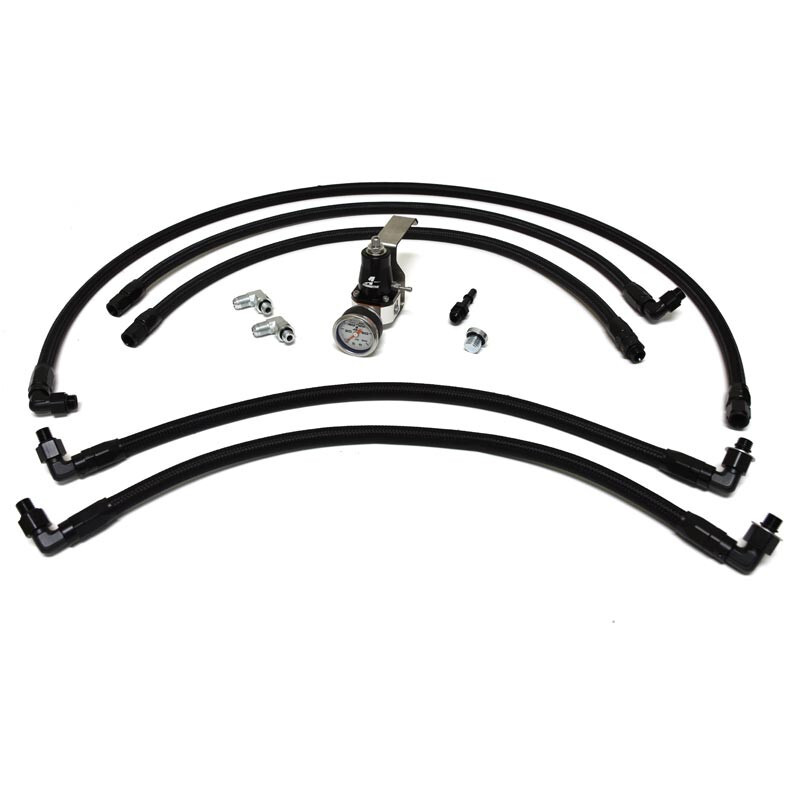
PACKING LIST:
- Passenger Rear Return Line (Longer w/ 1- 90° fitting)
- Driver Rear Return Line (Shorter w/ 1-90° fitting)
- Fuel Return Line (2 Female Fittings)
- Passenger & Driver Front Supply Lines (2-90° fittings on each end)
1 - Fuel Pressure Regulator & Gauge
1- Quick Connect Fuel Return Fitting 2-90° Fuel Fittings
1- Factory Pressure Regulator Plug
1 - Stainless Steel Mounting Bracket
5- Braided Fuel Lines
Before removing any parts from your truck, please compare the items you've received with the packing list above. This will ensure you have everything necessary to install this product.
Please ensure that the engine is cool to the touch before you begin installation. Please read instructions before installation.
Fuel Return (Plug location at the rear of the heads)
Rear of Engine
Front of Engine
Fuel Supply (Factory location at the front of the heads)
Fuel Filter Housing (Line Locations)
Factory Fuel Supply
Front Passenger Side Head
Front Driver Side Head
Factory Fuel Return
Adjustable Bypass Regulator
Assembly/Mounting: Remove the factory bracket from the regulator. Using the original hardware, install supplied stainless mounting bracket onto the regulator as shown below. Remove the brass plug from the front of the regulator. Install the supplied pressure gauge to the 1/8 NPT port on the regulator. Use thread sealant when installing the gauge. The Regulator will be mounted to the firewall using the ground bolt in the upper driver side corner of your engine bay.
AEROMOTIVE
Line Locations: (Rear Diver Side Head, Rear Passenger Side Head & Factory Fuel Return)
Driver Side
Passenger Side
Pressure Adjustment: After Installation - Turning the adjustment screw clockwise will increase the fuel pressure and counter clockwise will decrease. Once the desired fuel pressure is achieved, tighten the regulator adjustment jam nut.
Note: Gaining access to the plug/fittings on the rear of the cylinder heads can be difficult. We recommend removing both the turbo and up-pipes from the vehicle. It is at the owner's discretion to use any methods they see fit to gain access to these fittings. (Rust penetrant must be applied liberally beforehand to all exhaust fasteners to ease disassembly.)
Step 1: Disconnect Batteries.
Step 2: Drain 2-3 gallons of coolant.
Step 3: Located above your turbo, remove the clips for the plastic wire way. Fold towards the windshield of truck and retain with a zip tie.
Step 4: Remove the upper fan shroud by prying away from radiator through slots.
Step 5: Remove your air intake system and intake tube.
Step 6: Remove the radiator overflow tank from the truck (2 Bolts).
Step 7: (Remove turbo) - Remove: Intercooler pipes, Oil feed line (3 Bolts), VGT actuator harness plug, Up-pipe V-band clamp, Turbo V- band clamp (downpipe) and Turbo mounting bolts (3 Bolts).)
Step 8: Remove the fuel injector control module (4 Bolts).
Step 9: (Remove Up-Pipes) - Remove both driver and passenger side exhaust fasteners. Remove the driver side Y-pipe assembly, then the passenger side up-pipe.
Step 10: From underneath of the truck, remove the plugs and seals on the rear of the driver and passenger side cylinder heads. (Fuel will drain from the plugs.)
Driver Side
Passenger Side
Step 11: Install the supplied 90° fittings and fuel lines into both heads. (The ground bolt on the passenger side head must be removed for proper orientation of the fitting.)
Ground Bolt
Driver Side
Passenger Side
Step 12: Run the fuel lines from the head to Regulator. We recommend using zip ties to hold the lines in place. (Please reference the photo in the front of this manual for the proper line locations on the regulator.)
Step 13: Remove the factory fuel return line. Line runs from the fuel filter housing assembly to a factory quick connect fitting. (You'll need a 5/16" Fuel Line Disconnect Tool to remove the factory quick connect.)
Step 14: Attach the included male quick connect fitting the end of the fuel return line. Connect the fuel return from the regulator to the factory female quick connect fitting.
Step 15: Plug the factory fuel pressure regulator with the supplied plug.
Step 16: Disconnect the driver and passenger side fuel connections to the factory fuel filter housing. (See photo in the front of this manual)
Step 17: Remove the factory banjo fittings and seals from the front driver and passenger side cylinder heads. The Passenger side line may have to be cut to be removed. (To avoid debris getting into the fuel system we suggest covering the opening in the head until you install the new lines.)
Front Passenger Side
Front Driver Side
Step 18: Install the two included fuel supply lines from the fuel filter housing to the front of the cylinder heads. Washer side of the lines will be installed on the heads. (Passenger side: Underneath the alternator and across the intake manifold. Driver side: Behind the factory feed line.) Step 19: Check that all the fuel lines are properly tightened. Reinstall your removed parts and reconnect the batteries.
Step 20: Without starting the truck, cycle the ignition ON and OFF for the next few minutes.
Step 21: Once the fuel pressure gauge registers fuel system pressure and there are no fuel leaks, start the engine and adjust the regulator to your desired fuel pressure. 55-65 psi.
(Test Drive the truck: Re-check for leaks & Re-check fuel pressure)